Przy tworzeniu tej kartki użyłam trochę magii z techniki dekupażowej ;)
To make this card I used some decoupage magic ;)
1. Do wykonania kartki potrzebujemy:
- 2 kawałki grubszej kartki/kartonika (większy na bazę kartki, mniejszy na motyw ozdobny)
- linijkę
- ołówek
- nożyk do cięcia
- nożyczki
- klej do decoupage
- serwetkę
- pędzel
- dwustronną taśmę piankową
- podkładkę do cięcia
1. To make the card we need:
- 2 pieces of cardstock (a bigger one for the card base and a smaller one for the image)
- ruler
- craft knife
- scissors
- decoupage glue (Modge Podge or PVA will do too) - paper napkin/serviette
- brush
- double sided foam tape
- cutting mat 2.
2.Najpierw przygotujemy bazę naszej kartki. Bierzemy większy kartonik i zaznaczamy na nim prostokąt ( w tym przykładzie wybrałam prostokąt o bokach 21cm x 14cm ).
2. First, let’s make a card base. Take the bigger piece of cardstock and draw a rectangle on it ( in this tutorial I made 21cm x 14 cm = 8,25”x 5,75”). 3.
3. Następnie wycinamy nasz prostokąt i składamy go na pół wzdłuż dłuższego boku. Tak przygotowaną bazę kartki odkładamy na bok.
3. Next, cut the rectangle and fold it in half. The base is done and we can put it aside for a while.
 4.
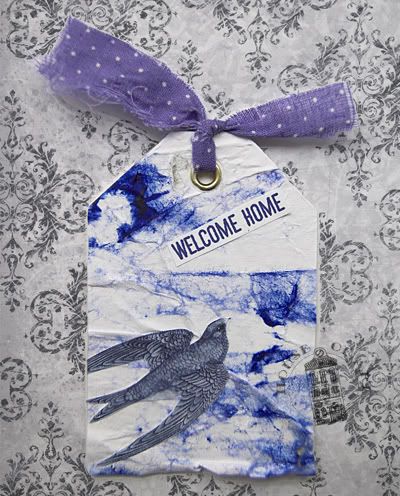
4. Bierzemy do ręki serwetkę i wycinamy z niej interesujący nas motyw, który umieścimy na naszej kartce.
4. Now take a paper napkin and cut out the chosen image. 5.
5. Odrywamy dwie warstwy serwetki, które nie mają na sobie nadruku - nam potrzebna będzie jedynie wierzchnia warstwa.
5. Peel off the two bottom layers from the image- in our project only the top printed layer is needed. 6.
6. Przygotowujemy mniejszy kartonik, na którym układamy motyw serwetkowy, klej oraz pędzelek.
6. Prapare the smaller piece of cardstock, glue and brush. 7.
7. Przyklejamy naszą serwetkę na kartonik. Na pędzelek nabieramy trochę kleju i smarujemy nim z wierzchu serwetkę. Najlepiej robić to od środka serwetki na zewnątrz - do brzegów.
7. Put the image on the smaller piece of cardstock. Apply some glue with the brush over the image. Applying glue from the center to the edges gives the best results. 8.
8. Po wyschnięciu kleju, wycinamy nasz motyw.
8. When the glue is dry, cut the image out. 9.
9. Z tyłu naszego wyciętego kartonika mocujemy taśmę piankową i odrywamy folię ochronną.
9. Place the foam tape on the back of the image and remove the ptotective foil.
 10.
10. Teraz przyklejamy nasz motyw na bazę kartki. Takim sposobem otrzymujemy kartkę z dekoracyjnym elementem 3D. Kartkę możemy jeszcze ozdobić wedle własnego gustu - np. umieścić napis, coś dorysować
10. Assemble the image on the base. Now we have a nice card with 3D element. You can embellish it more if you wish – eg. add some lettering or drawing.

Mam nadzieję, że podobał się Wam kurs i zainspiruje Was do stworzenia czegoś nowego :)
Pozdrawiam ciepło -
Pasiakowa :)
I hope You liked my tutorial and it will inspire You to make something new :)All the best to You - Pasiakowa :)


+copy.jpg)
+copy.jpg)